Vancouver Harbour : Sheet 1 (First Narrows to Second Narrows)
Vancouver Harbour : Sheet 1 (First Narrows to Second Narrows)
Vancouver Harbour : Sheet 2 (Point Grey to Second Narrows)
Vancouver Harbour : Sheet 2 (Point Grey to Second Narrows)
Vancouver Harbour : Sheet 3 (Second Narrows to Port Moody)
Vancouver Harbour : Sheet 3 (Second Narrows to Port Moody)

Index to Streets and Index to Registered Plans
![Plate 115 [Twelfth Street to Tenth Avenue to Twentieth Street to Sixth Avenue]](/uploads/r/null/3/e/b/3eb1b1f2663b11b9151d3e22347f7b1fe922789a9a5866f3bf24b29d5b441606/74148ea4-ae2e-43f6-b969-bcdfff9ac71a-1972-472_142.jpg)
Plate 115 [Twelfth Street to Tenth Avenue to Twentieth Street to Sixth Avenue]
![Plate 116 [Second Street to Tenth Avenue to Twelfth Street to Sixth Avenue]](/uploads/r/null/9/4/a/94a2eaaee6d845d8743ef8c81252057bc025656a77c773dd17e5aa37113b3116/fe7612b5-f7f4-4f6f-b985-a278440f8554-1972-472_142.jpg)
Plate 116 [Second Street to Tenth Avenue to Twelfth Street to Sixth Avenue]
![Plate 117 [Richmond/Sherbrooke/Langley Streets to Tenth Avenue to Second Street to Sixth Avenue]](/uploads/r/null/9/a/e/9ae713ff3ad4c6eb7965c92b08a6609a1355df01d8464e5dc0a4cd5eb347daa3/42ac18ba-9e2f-47a3-9c4d-62090da71521-1972-472_142.jpg)
Plate 117 [Richmond/Sherbrooke/Langley Streets to Tenth Avenue to Second Street to Sixth Avenue]
![Plate 118 [Brunette River to Tenth Avenue to Langley/School/Keary Streets to Brunette Street]](/uploads/r/null/1/2/c/12c40d6d14f873e070ca2b0a5bfe05f2d1b13bcaf1775c8dc357e7ca81a55dda/1f12f0be-27cc-46e2-a722-0a8c209f762c-1972-472_142.jpg)
Plate 118 [Brunette River to Tenth Avenue to Langley/School/Keary Streets to Brunette Street]
![Plate 119 [Twelfth Street to Sixth Avenue to Twentieth Street/Lulu Island to Queens Avenue]](/uploads/r/null/7/c/5/7c5b58a5a6cc6d172d2c03c80829cda67864964df06d73df2acf92a075f3ac61/14e5f78e-0f29-4094-a1f1-0e18e3e413de-1972-472_142.jpg)
Plate 119 [Twelfth Street to Sixth Avenue to Twentieth Street/Lulu Island to Queens Avenue]
![Plate 120 [Second Street to Sixth Avenue to Twelfth Street to Queens Avenue]](/uploads/r/null/5/5/c/55c9677679407ee3ed1945edde4c9075d95bd4718a26b039ac09364740c4d69a/d6480416-ce8f-4c85-9e61-c26d7aab755f-1972-472_142.jpg)
Plate 120 [Second Street to Sixth Avenue to Twelfth Street to Queens Avenue]
![Plate 121 [Keary Street to Sixth Avenue to Second Street to Park Row/Fraser River]](/uploads/r/null/e/0/b/e0b9110e611fca8e7037073a608b76e7d8623e29f738c47ba3234626357a78c4/da4cc06d-e15e-47b9-8187-683773fb2ef5-1972-472_142.jpg)
Plate 121 [Keary Street to Sixth Avenue to Second Street to Park Row/Fraser River]
![Plate 122 [Brunette River to Brunette Street to S.B. III Block 5 to Fraser River]](/uploads/r/null/1/b/5/1b59e8167ff1f1ff2d6e31874f106bae417d748922ed50d678f528ec9ec0e187/0abdbdc1-6755-45b1-aefc-0f6dd819227c-1972-472_142.jpg)
Plate 122 [Brunette River to Brunette Street to S.B. III Block 5 to Fraser River]
![Plate 123 [Sixth Street to Queens Avenue to eastern tips of Poplar and Lulu Islands to Fraser River]](/uploads/r/null/9/6/d/96d1122e04715f2f5792c19254f6b90991bd8c8f67f1c7becfcc31e30d3fbca4/a6cd188b-876a-455e-976e-285546a198db-1972-472_142.jpg)
Plate 123 [Sixth Street to Queens Avenue to eastern tips of Poplar and Lulu Islands to Fraser River]
![Plate 124 [B.C. Penitentiary grounds to Queens Avenue to Sixth Street to Fraser River]](/uploads/r/null/d/6/1/d6109bdd8c80b7d668876a803cd92924e7a854073c637f53db4b2c4f2f56e7dd/f8d97cae-19cc-470a-868c-534f137994b1-1972-472_142.jpg)
Plate 124 [B.C. Penitentiary grounds to Queens Avenue to Sixth Street to Fraser River]

Plate 125 Queensborough - south-west

Plate 126 Queensborough - south-east

Plate 127 Queensborough - north-west

Plate 128 Queensborough - north-east

Booklet cover

Location plan of blocks

Block no. 6

Block no. 11
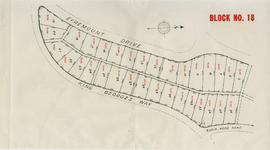
Block no. 18

Block no. 19 northern section

Block no. 19 southern section

Block no. 20

Block no. 21
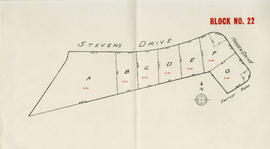
Block no. 22

Key plan
![Section 1 [Coal Harbour to Jervis Street]](/uploads/r/null/9/e/9/9e9001a91f4548dd7acb5cf68e9748a8fa0f3d8a10ad9a1235983466dfcc5e1f/d062ae77-a147-4ff8-8a2f-805b659ba7b3-1972-581_142.jpg)
Section 1 [Coal Harbour to Jervis Street]
![Section 2 [Jervis Street to Granville Street]](/uploads/r/null/c/f/5/cf5684518fb1cdac0f2d643c89acc078a47fe51a6a1896caf8fcfaf23999a562/c5097ebd-7d02-4ddb-be5e-d0f2658f2849-1972-581_142.jpg)
Section 2 [Jervis Street to Granville Street]
![Section 3 [Granville Street to Abbott Street]](/uploads/r/null/f/7/c/f7c18e536d617ec84d3c777f7d3bc02b98868d606842132c28166caaaa2dac3d/7e715850-e92f-48ba-bbc7-3678c5a832df-1972-581_142.jpg)
Section 3 [Granville Street to Abbott Street]
![Section 4 [Abbott Street to Gore Avenue]](/uploads/r/null/d/0/b/d0bdb5bfbb8ea9ebfe40ab12d3166035d9041c0874b44ccbcf0feaf7d343e90d/3d33023b-e416-4a39-b51c-f201b58c1e2c-1972-581_142.jpg)
Section 4 [Abbott Street to Gore Avenue]
![Section 5 [Gore Avenue to Heatley Avenue]](/uploads/r/null/c/a/9/ca9447df558507296e13d910ed22dcef00b730757d8104a6fdbd5d4e2955a8e1/f669a13d-c71c-4b3a-904d-555f84e054a3-1972-581_142.jpg)
Section 5 [Gore Avenue to Heatley Avenue]
![Section 6 [Heatley Avenue to Raymur Avenue]](/uploads/r/null/3/a/0/3a00a7d7ff2433b00b59b0d575006a89ff1e36eea4ecb961d585d3702308874e/61c58478-fbdc-4b03-b27d-4c69089913cd-1972-581_142.jpg)
Section 6 [Heatley Avenue to Raymur Avenue]
![Section 7 [Raymur Avenue to McLean Drive]](/uploads/r/null/6/6/9/669640404bae29e74b38e879b94454a054f0417ed40580a028e0db5b976a2e80/614de88a-1a33-4127-8bdf-f328f3cd4e22-1972-581_142.jpg)
Section 7 [Raymur Avenue to McLean Drive]
![Section 8 [McLean Drive to Salisbury Drive]](/uploads/r/null/9/1/c/91cb699e74dcee955f380f79208650cd638e651fcce20dbaf91e0f6fd7309854/2dcab9c8-db56-41e3-934c-91dbdfccf6f8-1972-581_142.jpg)
Section 8 [McLean Drive to Salisbury Drive]
![Section 9 [Salisbury Drive to McGill and Wall Streets]](/uploads/r/null/2/c/a/2ca00124652bd05f6e2ba7a38be0913c343f9df3ba7b70bb934ceb836de2fa89/dd14b8fd-0710-4ff6-9a02-2a79e289941f-1972-581_142.jpg)
Section 9 [Salisbury Drive to McGill and Wall Streets]
![Plate 2 [Hornby Street to Burrard Inlet to Thurlow Street to Pender Street]](/uploads/r/null/8/6/e/86edaec51670e0342c610b1530e723e6bb9890d9ef2f3b0db31ad30f0b559c61/adee6b6a-0b86-4884-b86a-cbcb2773c325-1972-582_142.jpg)
Plate 2 [Hornby Street to Burrard Inlet to Thurlow Street to Pender Street]
![Plate 3 [Seymour Street to Burrard Inlet to Hornby Street to Pender Street]](/uploads/r/null/b/6/e/b6e52f14a0b98be97e608633aaf0e2cdd8d5a51d8772a2b1ef80d1b748c7ebdc/eecaa1fa-a58b-4079-bf99-7f62b81de43f-1972-582_142.jpg)
Plate 3 [Seymour Street to Burrard Inlet to Hornby Street to Pender Street]
![Plate 4 [Hamilton & Cambie Streets to CP Railway yards to Seymour Street to Pender Street]](/uploads/r/null/7/e/9/7e931c45a666b558ca27b156ef8b243f5244a2820199fe50e04a7aaed21eeb20/06bd9672-ba7d-4013-aaac-2d7c9d8c5188-1972-582_142.jpg)
Plate 4 [Hamilton & Cambie Streets to CP Railway yards to Seymour Street to Pender Street]
![Plate 5 [Abbott Street to CP Rail right-of-way to Cambie Street to Pender Street]](/uploads/r/null/6/b/0/6b0b7025ad796cf3c24bd82d3128128aeb9437211623e8b002f3aa257584f3d8/b2e8d0db-d7d6-463d-9eed-a04b68cd2033-1972-582_142.jpg)
Plate 5 [Abbott Street to CP Rail right-of-way to Cambie Street to Pender Street]
![Plate 6 [Carrall Street to Water Street to Abbott Street to Pender Street]](/uploads/r/null/2/9/d/29d9b87c8a0b2ec0ebe43b7a1b209cf540943a17fcdf02f7fbf229b97c9beb06/65cae868-4124-4b7f-bb47-c6364f18c039-1972-582_142.jpg)
Plate 6 [Carrall Street to Water Street to Abbott Street to Pender Street]
![Plate 7 [Main Street to Powell Street to Columbia Street to Pender Street]](/uploads/r/null/d/f/b/dfb6afa705be957fb1edcc4db4eebed9e70de2f7da4428a558a100303c04c15c/49c15b71-8829-4feb-b5c6-1643c02b3907-1972-582_142.jpg)
Plate 7 [Main Street to Powell Street to Columbia Street to Pender Street]
![Plate 10 [CPR yards between Pender Street and Georgia viaduct]](/uploads/r/null/4/d/f/4df4324d57fa032950845b1be5ae2e04c2707c20e598bf307101a36ba7929130/176fae2d-a49c-4f75-99db-5ec876a739ce-1972-582_142.jpg)
Plate 10 [CPR yards between Pender Street and Georgia viaduct]
![Plate 11 [Great Northern, Canadian Pacific and BC Electric rail wards south of Pender Street]](/uploads/r/null/e/3/8/e3845e99a86b7c63562774d7ac49596466047a1ef5d4daf1ede5be765cc5f434/7338b83f-7dd7-4768-832b-57a4c33a7cc2-1972-582_142.jpg)
Plate 11 [Great Northern, Canadian Pacific and BC Electric rail wards south of Pender Street]
![Plate 16 [Seymour Street to Pender Street to Hornby Street to Georgia Street]](/uploads/r/null/5/b/3/5b3e6b9c6b363ebf8647de3c6cbd08be134849a51c2afb6ae2d8270992423224/1bbec413-4808-4972-ba42-96d87508f044-1972-582_142.jpg)
Plate 16 [Seymour Street to Pender Street to Hornby Street to Georgia Street]
![Plate 17 [Hamilton Street to Pender Street to Seymour Street to Georgia Street]](/uploads/r/null/d/b/0/db02a6582e4c80b48f4280307b3a1bf96e118648e3076fd16fe61c9a33d078a4/9e87cf0f-995c-4324-92af-170d1a2248d5-1972-582_142.jpg)
Plate 17 [Hamilton Street to Pender Street to Seymour Street to Georgia Street]
![Plate 18 [Seymour Street to Georgia Street to Hornby Street to Smithe Street]](/uploads/r/null/1/a/4/1a4187cb3019a9f0a84f3d7a4ffed7e4cb88181cbd49481d7904d57b9dfd1cc6/bd298293-e0af-4e5a-b89c-faab9207fc67-1972-582_142.jpg)
Plate 18 [Seymour Street to Georgia Street to Hornby Street to Smithe Street]
![Plate 19 [Hamilton Street to Georgia Stret to Seymour Street to Smithe Street]](/uploads/r/null/0/e/c/0ecea3ead6474f95320d3370c410bde1bef129fc8bcb8e54709f6f4aae7e3461/561bca07-f000-4835-ad8e-9e2bda093863-1972-582_142.jpg)
Plate 19 [Hamilton Street to Georgia Stret to Seymour Street to Smithe Street]