![[Bow of S.S. "Camosun" in dry dock]](/uploads/r/null/3/1/3176569a578882afd1b19bd7c685a5a66f7ae57a72b0049a42475505772eac0a/6bfe6bfa-188f-4457-80ce-d269438fcdad-A24295_142.jpg)
[Bow of S.S. "Camosun" in dry dock]
- AM54-S4-: Bo P520.3
- Item
- [ca. 1940]
Part of Major Matthews collection
57 results with digital objects Show results with digital objects
[Bow of S.S. "Camosun" in dry dock]
Part of Major Matthews collection
!["Lady Alexandra" entering Bowen Island Harbour [Deep Bay]](/uploads/r/null/c/3/a/c3a95e2e349e87b4d0a925f1aef9bf1f5ab7e06e65219d35efc8c66cf08fcf96/90a3832a-58d8-476c-8968-3b0baa3ad917-CVA374-320_142.jpg)
"Lady Alexandra" entering Bowen Island Harbour [Deep Bay]
![["Lady Alexandra" in Snug Cove]](/uploads/r/null/3/e/5/3e59d1e906307bb5f6cb3c1b9604e2df9a14a014ba3e936744fa38a2b2c0bfdb/90382d8e-7076-4eb7-b19c-6360bafa860c-CVA374-175_142.jpg)
["Lady Alexandra" in Snug Cove]

Photograph shows structural changes made in 1940 after funnel removed and observation room extended.
![[M.V. "Island King" at dock]](/uploads/r/null/4/2/3/423deeee3cd75683b988325e5d05470ae79fc4296b639cf68e8e386ea446ddff/b823c1b6-dc6f-4b0f-a1f2-6dce00c7441e-CVA374-59_142.jpg)
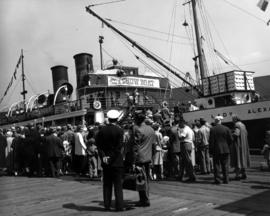
[People waiting to board the S.S. "Lady Alexandra" to see a performance of "Show Boat"]

Portion of Dining Salon, S.S. "Chilcotin"
![["Show Boat" cast members board S.S. "Lady Alexandra"]](/uploads/r/null/f/2/e/f2e887cb8b0e0b95e6b6160fcd59288dd965e84b1b9a3e5820ed9c473a53aa61/786aa7c6-9eb1-4d04-82da-40010e9c233f-CVA374-307_142.jpg)
["Show Boat" cast members board S.S. "Lady Alexandra"]
![["Show Boat" cast members board S.S. "Lady Alexandra"]](/uploads/r/null/3/b/a/3ba4a51e14def1f5efa22bcda200425edfad33668b4fcccf6a1187e251403e16/7d2181f6-4c0e-4b7a-8ffd-2193d814033f-CVA374-308_142.jpg)
["Show Boat" cast members board S.S. "Lady Alexandra"]
![[S.S. "Camosun"]](/uploads/r/null/e/5/e51555c3209738d3683a7176a5532c7605149280d648221d976ba600ea05cb7a/573158ae-fff0-4cce-9ebe-fc9d9646ebda-A24296_142.jpg)
Part of Major Matthews collection
![[S.S. "Camosun"]](/uploads/r/null/d/c/dcc06cc09fb0b4e9eac4b8c68223113f1856d3538cb4821eba38cf7b6d1acb8d/6a4d0323-2f82-436e-b5fa-64cff7e451c7-A24297_142.jpg)
Part of Major Matthews collection
![[S.S. "Cassiar" at dock]](/uploads/r/null/1/0/10b66cbf3f35b6cd53b471ae4ffd3bb623ddbae63476c605b90b4d76e1dbd5fb/da352ed0-0205-4106-ac86-39e8614d1c0c-A24300_142.jpg)
Part of Major Matthews collection
![[S.S. "Cassiar" (II) at dock]](/uploads/r/null/0/5/9/059d5fce2c8a9140d98d3bf55254ad6c29ef31003f84b39c3a9b0d808354ff2e/9cded323-7996-4bc4-a5d7-157f0ae7cfff-CVA374-21_142.jpg)
![[S.S. "Chelohsin" approaching First Narrows]](/uploads/r/null/f/8/b/f8b8100a22b5dd31efbb4f85a150cea3a635d11c56a598e189b6408e4e6ab503/668e840b-8c46-4c96-a4da-e8f20d833556-CVA374-29_142.jpg)
[S.S. "Chelohsin" approaching First Narrows]
![[S.S. "Chilcotin"]](/uploads/r/null/9/9/7/9975f09dc5584f2067ef89a2be1da5ad8e1b010b8f06219f79073d854f51b50a/6e8d5a64-b12d-4b76-8616-b6598e22d1f1-CVA374-36_142.jpg)
![[S.S. "Chilcotin"]](/uploads/r/null/1/4/e/14e2444e5a38c246d3f871cc8c74ff7c487b4d41a4fdfeca16b2277515aec8d5/2e2ab7fe-00e4-47a2-a9b0-79480a7a250b-CVA374-38_142.jpg)
![[S.S. "Chilcotin"]](/uploads/r/null/8/3/e/83e18792ae40b092d85e4e7c4b8ece1b0efab2dbad19a7e61dbd76515507f583/3890f2fb-01cf-4910-acbe-51847e08d438-CVA374-37_142.jpg)
![[S.S. "Chilcotin" in Gardner Inlet]](/uploads/r/null/6/e/6e97bed4f2a7e8d745c69c8f4dfdc94fd9eea3d266cf4166ad7dc0ca4d1219e0/149bc75d-043a-4336-8472-7a6a0d1e73bf-A24291_142.jpg)
[S.S. "Chilcotin" in Gardner Inlet]
Part of Major Matthews collection
Photograph shows the glacier clad mountains of Europa Reach.
![[S.S. "Chilcotin" on summer cruise service to north coast of B.C. and Alaska]](/uploads/r/null/7/e/2/7e2db9210f464ac3dadc0c92c787f2be94279772e1db8d40cbb4c64b3700e70a/71b70ec3-e01f-4b9b-913d-4ce061f2543d-CVA374-40_142.jpg)
[S.S. "Chilcotin" on summer cruise service to north coast of B.C. and Alaska]
![[S.S. "Chilcotin" on summer cruise service to north coast of B.C. and Alaska]](/uploads/r/null/4/3/d/43dad38fdba44b88b977f3f2d96b22fd4eebe82d331b9efcc6569a478db017cd/598c28f8-9a51-4e27-8e0f-115526272ac6-CVA374-39_142.jpg)
[S.S. "Chilcotin" on summer cruise service to north coast of B.C. and Alaska]

Photograph shows trucks and cars on the deck
![[S.S. "Chilkoot" (II) in Vancouver Harbour]](/uploads/r/null/9/b/6/9b60ea2e121f6d034964dfba23b0cdd585c1b2340d86a89b6a8a12e6297e17e2/a4d68694-8363-487b-a242-f0e4f0519887-CVA374-53_142.jpg)
[S.S. "Chilkoot" (II) in Vancouver Harbour]
Photograph shows the Marine Building in the background
![[S.S. "Chilkoot" (II) in Vancouver Harbour]](/uploads/r/null/e/c/d/ecd393347a40904973944fa9822d1ed60c25f584fbf62b68ae43b4591be69804/bca0a2f1-7356-47f0-b1b2-6c744be95dbf-CVA374-52_142.jpg)
[S.S. "Chilkoot" (II) in Vancouver Harbour]
![[S.S. "Chilliwack" (II) at dock]](/uploads/r/null/8/8/5/885eb30a82bd108ab7d6c036016718d673c9c6815b32be25f61a0e74b67b9cea/5c20996e-fd23-43f3-a44c-b4c410ff6858-CVA374-57_142.jpg)
[S.S. "Chilliwack" (II) at dock]
![[S.S. "Coquitlam" (II) Deluxe Stateroom]](/uploads/r/null/8/a/b/8ab3f649a4fbb542953ecd8a24e2fe5295946aee266a815c15c42b2a34314ea9/fc273d2c-c536-40ab-80c4-7d2aef3cb231-CVA374-83_142.jpg)
[S.S. "Coquitlam" (II) Deluxe Stateroom]
![[S.S. "Coquitlam" (II) Dining Salon]](/uploads/r/null/a/a/5/aa5e4329683e78bd0393e2c534ed5d561d1baee820698e0e049ed8f759fe8f17/aba9559c-441e-4ccc-ad19-01abef209b84-CVA374-80_142.jpg)
[S.S. "Coquitlam" (II) Dining Salon]
![[S.S. "Coquitlam" (II)] Dining Salon](/uploads/r/null/2/4/b/24b8d22e729bcb6ce0aa5ef62000832600e149ba27caa733d178a3299bbb145d/d1f96235-e38f-4e03-8efb-10d6d7184328-CVA374-81_142.jpg)
[S.S. "Coquitlam" (II)] Dining Salon
![[S.S. "Coquitlam" (II) Entrance Lobby]](/uploads/r/null/d/0/1/d01a2c15329abadd6736ac24cfa4501e4dbc5b63878a44bbd7734ddfc30f85e7/3f852832-8e54-45a6-b699-4f58feb82266-CVA374-75_142.jpg)
[S.S. "Coquitlam" (II) Entrance Lobby]
![[S.S. "Coquitlam" (II) Entrance Lobby]](/uploads/r/null/1/1/5/115d54fb6a2dcfd7d642952602507cc3296683210e813da5368e42616aa05c10/2e335cbf-6784-4160-b2a4-470e20a69234-CVA374-77_142.jpg)
[S.S. "Coquitlam" (II) Entrance Lobby]
![[S.S. "Coquitlam" (II) Entrance Lobby]](/uploads/r/null/b/c/a/bcaac7f2c7f9a9a370a92129f9fe54431cf32d6eb39534212e1cd2acab0a66d7/2b7f01eb-194d-4746-9ea3-837787d7e1d7-CVA374-76_142.jpg)
[S.S. "Coquitlam" (II) Entrance Lobby]
![[S.S. "Coquitlam" (II) Lounge - Upper Deck]](/uploads/r/null/b/8/3/b8319d2e7b4021a586b57141d18ecff82b0f737bd452120a89e5db045459acf4/861c5096-4c53-45a4-9774-20ad0b8b23ce-CVA374-73_142.jpg)
[S.S. "Coquitlam" (II) Lounge - Upper Deck]
![[S.S. "Coquitlam" (II) Lounge - Upper Deck]](/uploads/r/null/b/e/f/befb0cf5e38d5f0d7f79f3bd170bda716c464db08b184a94e2b3d467c0f86013/10f45f3a-0e80-49de-8c3f-814a81cfa748-CVA374-74_142.jpg)
[S.S. "Coquitlam" (II) Lounge - Upper Deck]

S.S. "Coquitlam" (II) Lounge - Upper Deck
![[S.S. "Coquitlam" (II)] Lounge, Lower or Upper Deck](/uploads/r/null/a/d/6/ad6982252f8809c787bf0b9a2389ea7310e81dbc9d185b2b256a8ac53c57ec85/62292207-4ad9-4db3-875b-da8e5962c85a-CVA374-79_142.jpg)
[S.S. "Coquitlam" (II)] Lounge, Lower or Upper Deck
![[S.S. "Coquitlam" (II) Lounge, Main Deck]](/uploads/r/null/0/d/6/0d66c13192f229b66a0ecd39c0c62795a1306b9a65d6443e672ee2727a5cfe5c/a0ad759c-679c-4087-8f75-8114ec462492-CVA374-78_142.jpg)
[S.S. "Coquitlam" (II) Lounge, Main Deck]
![[S.S. "Coquitlam" (II) moving from False Creek to Union Dock]](/uploads/r/null/f/6/8/f68e8cf9f63af9e0ae1e14ecc25248e7f6ed43edf7d38a9a294af5ffd40ec798/c687427b-98cb-426e-9247-327b789e5ea9-CVA374-63_142.jpg)
[S.S. "Coquitlam" (II) moving from False Creek to Union Dock]
Photograph shows the ship passing through the Granville Bridge swing span and approaching the Kitsilano Trestle Bridge, some industries such as British Ropes and B.C. Equipment on the south shore and city hall in the background
![[S.S. "Coquitlam" (II) moving from False Creek to Union Dock]](/uploads/r/null/b/2/9/b293e34a45b4ae1cea90b4471ba4a2ef3f978339c282bcf968869b4311429193/862e25de-8b5d-4e86-9c62-377197f5c21f-CVA374-70_142.jpg)
[S.S. "Coquitlam" (II) moving from False Creek to Union Dock]
![[S.S. "Coquitlam" (II) moving from False Creek to Union Dock]](/uploads/r/null/7/f/f/7ff66495e53f8de7ce042d399aebc8d6cf4d241d1d68744f53e2d05dbe63e2b9/e24e89f8-5676-49d3-b08f-91f96e09a91a-CVA374-67_142.jpg)
[S.S. "Coquitlam" (II) moving from False Creek to Union Dock]
Photograph shows a view from the Burrard Bridge
![[S.S. "Coquitlam" (II) moving from False Creek to Union Dock]](/uploads/r/null/8/f/5/8f521c8b8615594258b24442a9f4b71c4b0a057b9c3276f8ead8d0452335dad7/eb5dcc18-94b6-443b-aad1-a9f7f06c66ff-CVA374-65_142.jpg)
[S.S. "Coquitlam" (II) moving from False Creek to Union Dock]
Photograph shows the ship passing through the Kitsilano Trestle Bridge swing span, the Granville Bridge, some industries such as British Ropes and B.C. Equipment on the south shore and the tug "Galiot"
![[S.S. "Coquitlam" (II) moving from False Creek to Union Dock]](/uploads/r/null/0/f/3/0f3b9f7c07ee9307114adbf4ea304bc090cadc9e0b51caa44b408b04b787e24a/371cc6c7-bbb6-45e7-9e73-093b61d01428-CVA374-68_142.jpg)
[S.S. "Coquitlam" (II) moving from False Creek to Union Dock]
Photograph shows the ship passing under Burrard Bridge.
![[S.S. "Coquitlam" (II) moving from False Creek to Union Dock]](/uploads/r/null/b/b/2/bb283d835daf9606084c86df3d3b1f7e7e50f19010848767c362838b38456d96/cc913466-73ae-4c76-b801-5cf79b223597-CVA374-71_142.jpg)
[S.S. "Coquitlam" (II) moving from False Creek to Union Dock]
Photograph taken from Prospect Point showing the Lions Gate Bridge
![[S.S. "Coquitlam" (II) moving from False Creek to Union Dock]](/uploads/r/null/5/7/7/57743d3d09cc8db5b1e8fa927093a4ccfd59ab4f6824c09d7479bfdf56e0a91f/4b362e06-08de-49c4-819c-a6b345c15c6b-CVA374-64_142.jpg)
[S.S. "Coquitlam" (II) moving from False Creek to Union Dock]
Photograph shows the ship passing through the Kitsilano Trestle Bridge swing span, the Granville Bridge and some industries such as British Ropes and B.C. Equipment on the south shore
![[S.S. "Coquitlam" (II) moving from False Creek to Union Dock]](/uploads/r/null/9/f/e/9fef94be4bced78e5b2ee398e9490de0e7333b53f7c2c6097aff6c75d3077f44/0576063b-226f-4408-8cdb-86b012fde49e-CVA374-66_142.jpg)
[S.S. "Coquitlam" (II) moving from False Creek to Union Dock]
Photograph shows a view from the Burrard Bridge and the Kitsilano Trestle Bridge
![[S.S. "Coquitlam" (II) moving from False Creek to Union Dock]](/uploads/r/null/5/2/8/528cebd0b181cbfda6d82518ae9ceaacdd894c44b9bab4dc0f4326685883382a/40917e68-7569-4c20-88d3-d0b7accebf94-CVA374-69_142.jpg)
[S.S. "Coquitlam" (II) moving from False Creek to Union Dock]
Photograph shows Sunset Beach
![[S.S. "Coquitlam" (II) Standard Stateroom]](/uploads/r/null/6/f/4/6f4572b7b05e9ed2eb44bfb1e74b689a8d507c43c8e4cac0205038d3909299e9/79c5d85f-d65f-450f-9c18-50c539d406ac-CVA374-84_142.jpg)
[S.S. "Coquitlam" (II) Standard Stateroom]
![[S.S. "Coquitlam" (II) Standard Stateroom]](/uploads/r/null/1/9/e/19ed835b492a2ae16737f313deddcfff3caa8d088489f16ddd424afc782f0a9a/1e7008e8-e8e9-4ba9-a02e-30e34fa8426c-CVA374-85_142.jpg)
[S.S. "Coquitlam" (II) Standard Stateroom]

![[S.S. Greenhill Park on fire after explosion]](/uploads/r/null/9/a/9a5076f48417f886f592fafc2fa6591eb04e0275df3dd454b2ae8f9531b1d651/4fb99a01-47d3-470b-a85f-1d398a265541-A71776_142.jpg)
[S.S. Greenhill Park on fire after explosion]
Photograph shows a fireboat
![[S.S. "Lady Alexandra" approaching Vancouver]](/uploads/r/null/4/4/b/44bf6806c563fc907cddb924b55ea1dcf8ef998a369a698f9893ee052780ce40/f019ad6a-d1c7-4a97-8282-74f6bdd7a09b-CVA374-91_142.jpg)
[S.S. "Lady Alexandra" approaching Vancouver]
