![[Deck House and Passengers - S.S. "Lady Pam"]](/uploads/r/null/e/9/8/e98dbd1d66d010ec857a2fbc1f4e6a62e36a1ffec30d6ec46eb7d22480468761/eb5ce581-255c-4b74-9a2c-30df074b55d9-CVA374-116_142.jpg)
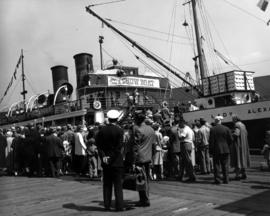
[Deck House and Passengers - S.S. "Lady Pam"]
- AM75-S1-: CVA 374-116
- Item
- [between 1935 and 1948]
[Deck House and Passengers - S.S. "Lady Pam"]

Dining Saloon T.S.S. "Cardena"

Photograph shows structural changes made in 1940 after funnel removed and observation room extended.
![[Loading freight aboard steamer "Chilcotin"]](/uploads/r/null/9/a/a/9aa44cb5a2c0b87b7b2d02809fb93cf99aab3eb4841ca8fdf2c1dc0132f616fd/6bb51773-705c-4d0d-b784-66f5084f9cc7-CVA374-166_142.jpg)
[Loading freight aboard steamer "Chilcotin"]
![[M.V. "Island King" at dock]](/uploads/r/null/4/2/3/423deeee3cd75683b988325e5d05470ae79fc4296b639cf68e8e386ea446ddff/b823c1b6-dc6f-4b0f-a1f2-6dce00c7441e-CVA374-59_142.jpg)

Observation Room T.S.S. "Cardena"
Photograph shows wicker chairs
![[Passengers boarding steamers at Union Dock]](/uploads/r/null/3/b/3b51c1f9e1fa1299fbb09ecc6ae10953a8e4754f9f2e630f24fa675f7fe181ef/e098768a-0634-460d-8a3a-cdf8a79560e3-CVA374-147_142.jpg)
[Passengers boarding steamers at Union Dock]
[People waiting to board the S.S. "Lady Alexandra" to see a performance of "Show Boat"]


Portion of Dining Salon, S.S. "Chilcotin"
![["Show Boat" cast members board S.S. "Lady Alexandra"]](/uploads/r/null/f/2/e/f2e887cb8b0e0b95e6b6160fcd59288dd965e84b1b9a3e5820ed9c473a53aa61/786aa7c6-9eb1-4d04-82da-40010e9c233f-CVA374-307_142.jpg)
["Show Boat" cast members board S.S. "Lady Alexandra"]
![["Show Boat" cast members board S.S. "Lady Alexandra"]](/uploads/r/null/3/b/a/3ba4a51e14def1f5efa22bcda200425edfad33668b4fcccf6a1187e251403e16/7d2181f6-4c0e-4b7a-8ffd-2193d814033f-CVA374-308_142.jpg)
["Show Boat" cast members board S.S. "Lady Alexandra"]
![[Sister ships S.S. "Lady Cynthia" (left) and "Lady Cecilia"]](/uploads/r/null/4/8/1/4813ab2d2f27d0e03ca1ccc95dc073851e674ade81382c33d3dd7e6d3451ffd1/ec63e33a-8d79-4fdb-b2c6-86279c53f26a-CVA374-105_142.jpg)
[Sister ships S.S. "Lady Cynthia" (left) and "Lady Cecilia"]
![[S.S. "Capilano" backing out from Union Dock]](/uploads/r/null/d/4/0/d40238f4894f87c46bab806a09e84dfa86427faf1a0965f315109d4bd0abe20f/50f61268-353b-49ee-aa14-d9cda5ff6cdb-CVA374-139_142.jpg)
[S.S. "Capilano" backing out from Union Dock]
Photograph shows a small vessel on extreme left "Chasina", left background bow of C.P.R.'s "Charmer", right background unidentified Admiral Line vessel, extreme right, stern of "Cheam"
![[S.S. "Cardena"]](/uploads/r/null/b/7/7/b77b87b7414b26dab10d549dc0f92939840ed2f4b0af4ab9e47b86b50055bc01/ed9534be-65f3-49fc-95e1-86a2f1de6b94-CVA374-15_142.jpg)
![[S.S. "Cardena" entering First Narrows]](/uploads/r/null/3/6/4/364471688e68dfb8c727b864555f4a506a02fa8836a1c593b79f6dec20924087/d04fec3f-2b5e-4677-8524-b873752db4be-CVA374-14_142.jpg)
[S.S. "Cardena" entering First Narrows]
![[S.S. "Cassiar" (II) at dock]](/uploads/r/null/0/5/9/059d5fce2c8a9140d98d3bf55254ad6c29ef31003f84b39c3a9b0d808354ff2e/9cded323-7996-4bc4-a5d7-157f0ae7cfff-CVA374-21_142.jpg)
![[S.S. "Catala"]](/uploads/r/null/b/0/9/b09b7c8c83837566e632bcdd705d1ef1e5f7bbe621a62d4d19a4399d68015579/7a5ef16f-9708-4049-8973-e0c7ba11709b-CVA374-25_142.jpg)
![[S.S. "Catala" - Stern View, docked at Union Wharf]](/uploads/r/null/7/b/7/7b7b7eaa8ab39409d42d0c762b0800fef3292ff07fa5bab06ee21d8e50f43089/8730a51d-c93b-486f-a3ab-f6019249d7b0-CVA374-23_142.jpg)
[S.S. "Catala" - Stern View, docked at Union Wharf]
![[S.S. "Catala" entering Vancouver Harbour]](/uploads/r/null/b/f/3/bf3f58d47d743378672e643d22fead2c37a2a2cb9b861bc4e78d4e7be16f90cd/6b88b3f3-130b-40a7-8c12-43194eead1b7-CVA374-22_142.jpg)
[S.S. "Catala" entering Vancouver Harbour]
![[S.S. "Cheakamus"]](/uploads/r/null/3/5/2/352fa4caa11a8b08c0770ead3e375afc33320c8443de4829d89a47f37bd34abe/6ae5acf9-9f3e-4286-adbb-4c3b80730bae-CVA374-27_142.jpg)
![[S.S. "Chelohsin" approaching First Narrows]](/uploads/r/null/f/8/b/f8b8100a22b5dd31efbb4f85a150cea3a635d11c56a598e189b6408e4e6ab503/668e840b-8c46-4c96-a4da-e8f20d833556-CVA374-29_142.jpg)
[S.S. "Chelohsin" approaching First Narrows]
![[S.S. "Chelohsin" approaching First Narrows]](/uploads/r/null/6/c/9/6c9a9ab9964fc30864de3c8c259208ac52dda339c441613478f29ab39d69fae5/d126a10a-0c16-47e9-bf87-0614a3854e42-CVA374-34_142.jpg)
[S.S. "Chelohsin" approaching First Narrows]
![[S.S. "Chelohsin" leaving Vancouver]](/uploads/r/null/c/f/0/cf0d56f12ce3a8ea26cf7bb67f814189a400ef42cc8515ccf5a403f5efcf894a/f08d2b1b-e565-4a52-b2ac-8e13662faa5c-CVA374-35_142.jpg)
[S.S. "Chelohsin" leaving Vancouver]
Photograph shows Pier B-C in background
![[S.S. "Chilcotin"]](/uploads/r/null/9/9/7/9975f09dc5584f2067ef89a2be1da5ad8e1b010b8f06219f79073d854f51b50a/6e8d5a64-b12d-4b76-8616-b6598e22d1f1-CVA374-36_142.jpg)
![[S.S. "Chilcotin"]](/uploads/r/null/1/4/e/14e2444e5a38c246d3f871cc8c74ff7c487b4d41a4fdfeca16b2277515aec8d5/2e2ab7fe-00e4-47a2-a9b0-79480a7a250b-CVA374-38_142.jpg)
![[S.S. "Chilcotin"]](/uploads/r/null/8/3/e/83e18792ae40b092d85e4e7c4b8ece1b0efab2dbad19a7e61dbd76515507f583/3890f2fb-01cf-4910-acbe-51847e08d438-CVA374-37_142.jpg)

Photograph shows trucks and cars on the deck
![[S.S. "Chilkoot" (II) in Vancouver Harbour]](/uploads/r/null/9/b/6/9b60ea2e121f6d034964dfba23b0cdd585c1b2340d86a89b6a8a12e6297e17e2/a4d68694-8363-487b-a242-f0e4f0519887-CVA374-53_142.jpg)
[S.S. "Chilkoot" (II) in Vancouver Harbour]
Photograph shows the Marine Building in the background
![[S.S. "Chilkoot" (II) in Vancouver Harbour]](/uploads/r/null/e/c/d/ecd393347a40904973944fa9822d1ed60c25f584fbf62b68ae43b4591be69804/bca0a2f1-7356-47f0-b1b2-6c744be95dbf-CVA374-52_142.jpg)
[S.S. "Chilkoot" (II) in Vancouver Harbour]
![S.S. "Chilliwack" [(II) approaching First Narrows]](/uploads/r/null/6/7/d/67d6a384228293fc85dfce53afc878a0790f00b351c6d749e0c8733b190c7639/00339ad5-d182-4518-a76b-e63c0af50898-CVA374-58_142.jpg)
S.S. "Chilliwack" [(II) approaching First Narrows]
![[S.S. "Chilliwack" (II) at dock]](/uploads/r/null/8/8/5/885eb30a82bd108ab7d6c036016718d673c9c6815b32be25f61a0e74b67b9cea/5c20996e-fd23-43f3-a44c-b4c410ff6858-CVA374-57_142.jpg)
[S.S. "Chilliwack" (II) at dock]
![[S.S. "Coquitlam" (II) Deluxe Stateroom]](/uploads/r/null/8/a/b/8ab3f649a4fbb542953ecd8a24e2fe5295946aee266a815c15c42b2a34314ea9/fc273d2c-c536-40ab-80c4-7d2aef3cb231-CVA374-83_142.jpg)
[S.S. "Coquitlam" (II) Deluxe Stateroom]
![[S.S. "Coquitlam" (II) Dining Salon]](/uploads/r/null/a/a/5/aa5e4329683e78bd0393e2c534ed5d561d1baee820698e0e049ed8f759fe8f17/aba9559c-441e-4ccc-ad19-01abef209b84-CVA374-80_142.jpg)
[S.S. "Coquitlam" (II) Dining Salon]
![[S.S. "Coquitlam" (II)] Dining Salon](/uploads/r/null/2/4/b/24b8d22e729bcb6ce0aa5ef62000832600e149ba27caa733d178a3299bbb145d/d1f96235-e38f-4e03-8efb-10d6d7184328-CVA374-81_142.jpg)
[S.S. "Coquitlam" (II)] Dining Salon
![[S.S. "Coquitlam" (II) Entrance Lobby]](/uploads/r/null/d/0/1/d01a2c15329abadd6736ac24cfa4501e4dbc5b63878a44bbd7734ddfc30f85e7/3f852832-8e54-45a6-b699-4f58feb82266-CVA374-75_142.jpg)
[S.S. "Coquitlam" (II) Entrance Lobby]
![[S.S. "Coquitlam" (II) Entrance Lobby]](/uploads/r/null/1/1/5/115d54fb6a2dcfd7d642952602507cc3296683210e813da5368e42616aa05c10/2e335cbf-6784-4160-b2a4-470e20a69234-CVA374-77_142.jpg)
[S.S. "Coquitlam" (II) Entrance Lobby]
![[S.S. "Coquitlam" (II) Entrance Lobby]](/uploads/r/null/b/c/a/bcaac7f2c7f9a9a370a92129f9fe54431cf32d6eb39534212e1cd2acab0a66d7/2b7f01eb-194d-4746-9ea3-837787d7e1d7-CVA374-76_142.jpg)
[S.S. "Coquitlam" (II) Entrance Lobby]
![[S.S. "Coquitlam" (II) Lounge - Upper Deck]](/uploads/r/null/b/8/3/b8319d2e7b4021a586b57141d18ecff82b0f737bd452120a89e5db045459acf4/861c5096-4c53-45a4-9774-20ad0b8b23ce-CVA374-73_142.jpg)
[S.S. "Coquitlam" (II) Lounge - Upper Deck]

S.S. "Coquitlam" (II) Lounge - Upper Deck
![[S.S. "Coquitlam" (II) Lounge - Upper Deck]](/uploads/r/null/b/e/f/befb0cf5e38d5f0d7f79f3bd170bda716c464db08b184a94e2b3d467c0f86013/10f45f3a-0e80-49de-8c3f-814a81cfa748-CVA374-74_142.jpg)
[S.S. "Coquitlam" (II) Lounge - Upper Deck]
![[S.S. "Coquitlam" (II)] Lounge, Lower or Upper Deck](/uploads/r/null/a/d/6/ad6982252f8809c787bf0b9a2389ea7310e81dbc9d185b2b256a8ac53c57ec85/62292207-4ad9-4db3-875b-da8e5962c85a-CVA374-79_142.jpg)
[S.S. "Coquitlam" (II)] Lounge, Lower or Upper Deck
![[S.S. "Coquitlam" (II) Lounge, Main Deck]](/uploads/r/null/0/d/6/0d66c13192f229b66a0ecd39c0c62795a1306b9a65d6443e672ee2727a5cfe5c/a0ad759c-679c-4087-8f75-8114ec462492-CVA374-78_142.jpg)
[S.S. "Coquitlam" (II) Lounge, Main Deck]
![[S.S. "Coquitlam" (II) moving from False Creek to Union Dock]](/uploads/r/null/f/6/8/f68e8cf9f63af9e0ae1e14ecc25248e7f6ed43edf7d38a9a294af5ffd40ec798/c687427b-98cb-426e-9247-327b789e5ea9-CVA374-63_142.jpg)
[S.S. "Coquitlam" (II) moving from False Creek to Union Dock]
Photograph shows the ship passing through the Granville Bridge swing span and approaching the Kitsilano Trestle Bridge, some industries such as British Ropes and B.C. Equipment on the south shore and city hall in the background
![[S.S. "Coquitlam" (II) moving from False Creek to Union Dock]](/uploads/r/null/b/2/9/b293e34a45b4ae1cea90b4471ba4a2ef3f978339c282bcf968869b4311429193/862e25de-8b5d-4e86-9c62-377197f5c21f-CVA374-70_142.jpg)
[S.S. "Coquitlam" (II) moving from False Creek to Union Dock]
![[S.S. "Coquitlam" (II) moving from False Creek to Union Dock]](/uploads/r/null/7/f/f/7ff66495e53f8de7ce042d399aebc8d6cf4d241d1d68744f53e2d05dbe63e2b9/e24e89f8-5676-49d3-b08f-91f96e09a91a-CVA374-67_142.jpg)
[S.S. "Coquitlam" (II) moving from False Creek to Union Dock]
Photograph shows a view from the Burrard Bridge
![[S.S. "Coquitlam" (II) moving from False Creek to Union Dock]](/uploads/r/null/8/f/5/8f521c8b8615594258b24442a9f4b71c4b0a057b9c3276f8ead8d0452335dad7/eb5dcc18-94b6-443b-aad1-a9f7f06c66ff-CVA374-65_142.jpg)
[S.S. "Coquitlam" (II) moving from False Creek to Union Dock]
Photograph shows the ship passing through the Kitsilano Trestle Bridge swing span, the Granville Bridge, some industries such as British Ropes and B.C. Equipment on the south shore and the tug "Galiot"
![[S.S. "Coquitlam" (II) moving from False Creek to Union Dock]](/uploads/r/null/0/f/3/0f3b9f7c07ee9307114adbf4ea304bc090cadc9e0b51caa44b408b04b787e24a/371cc6c7-bbb6-45e7-9e73-093b61d01428-CVA374-68_142.jpg)
[S.S. "Coquitlam" (II) moving from False Creek to Union Dock]
Photograph shows the ship passing under Burrard Bridge.
![[S.S. "Coquitlam" (II) moving from False Creek to Union Dock]](/uploads/r/null/5/7/7/57743d3d09cc8db5b1e8fa927093a4ccfd59ab4f6824c09d7479bfdf56e0a91f/4b362e06-08de-49c4-819c-a6b345c15c6b-CVA374-64_142.jpg)
[S.S. "Coquitlam" (II) moving from False Creek to Union Dock]
Photograph shows the ship passing through the Kitsilano Trestle Bridge swing span, the Granville Bridge and some industries such as British Ropes and B.C. Equipment on the south shore
![[S.S. "Coquitlam" (II) moving from False Creek to Union Dock]](/uploads/r/null/9/f/e/9fef94be4bced78e5b2ee398e9490de0e7333b53f7c2c6097aff6c75d3077f44/0576063b-226f-4408-8cdb-86b012fde49e-CVA374-66_142.jpg)
[S.S. "Coquitlam" (II) moving from False Creek to Union Dock]
Photograph shows a view from the Burrard Bridge and the Kitsilano Trestle Bridge